Footnotes and Comments
Inserting Footnotes and Endnotes
Footnotes (and occasionally Endnotes) are used for citations in Chicago and SBL. This is how you add footnotes to your document:
- Click where you want the superscript number (to begin your footnote or endnote) to appear in the text of your document. Footnotes are more common and appear like this: 1
- Click the “References” tab.
- Click “Insert Footnote” or “Insert Endnote,” depending on which system you are required to use for your paper.
- Footnotes will appear at the bottom of the same page as your citation. Endnotes will all appear together on a new page at the end of your document. This formatting will happen automatically.
- Endnotes will automatically format as Roman numerals.
- Type in the correct citation information about your source in the corresponding footnote or endnote.
When created, a footnote should have a superscript at the bottom of your page with a line above it (if it is the first footnote on the page). To remove a footnote, simply backspace over the superscript in your paper and the footnote will remove itself. Here is an example of a blank footnote:
1. ________________
Please note that Footnotes should use the same formatting as the rest of your paper (12 pt font, double spaced, with the first line of each footnoted indented half an inch.

Inserting and Deleting Comments
Comments are useful for revision or peer-review assignments. They allow you to "comment" on the document without interrupting the text or formatting.
- Highlight (click and drag over) the text in your document that you want to attach a comment to.
- Click the “Review” tab.
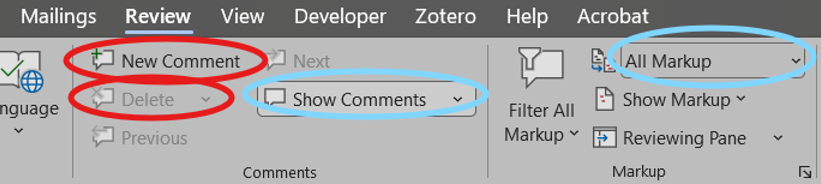
- Click “New Comment” (circled in red), and type in your comment on the side. Click the arrow to post it.
- You can delete your comment by clicking on the comment and then the delete button (circled in red; underneath the “New Comment” button), or by clicking on the three dots at the top of your comment and clicking “Delete thread.”
- Make sure you delete all comments before you print your document or save it as a PDF (unless you are submitting a peer review assignment and want the comments to be available to the user receiving feedback) because leaving the comments in can cause formatting problems.
Seeing Comments that are Hidden
Downloaded Word
- Click on the “Review” tab.
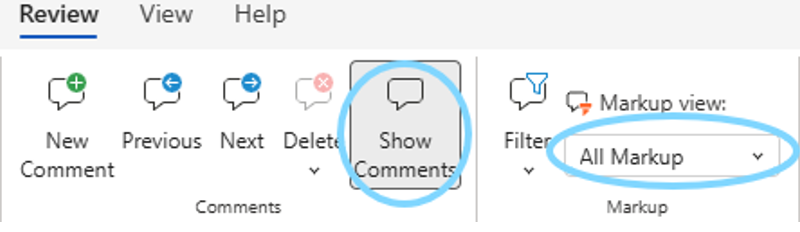
- To the right of the comments section, you should see a dropdown (circled in blue). It will say one of four things: Original, No Markup, Simple Markup, or All Markup.
- Change this dropdown to “Simple Markup” or “All Markup” (if it doesn’t say this already).
- If you still don’t see any comments, make sure the “Show Comments” button to the right of “New Comment” (circled in blue) is selected. It will be surrounded by a grey box if selected and you should be able to see comments on the document.
For Online Word
- Click on the “Review” tab.
- To the right of the comments section, you should see a dropdown labelled “Markup view.” It will have two options: Markup in margin (Simple Markup) and Markup on page (All Markup).
- Change this dropdown to “Markup on page” (All Markup).
- If you still don’t see any comments, make sure the “Show Comments” button to the right of “New Comment” is selected. It will be surrounded by a grey box if selected and you should be able to see comments on the document.