
Hanging Indents
Downloaded Word
There are two ways to set up hanging indents on the Word app.
Using the Paragraph Spacing Settings:
- Click and drag to highlight your entire list of references (or do these settings before starting your list). Do not highlight your title (Bibliography, References, Works Cited).
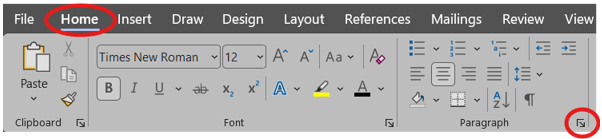
- Click the “Home” tab.
-
Click the box/arrow button in the “Paragraph” section.
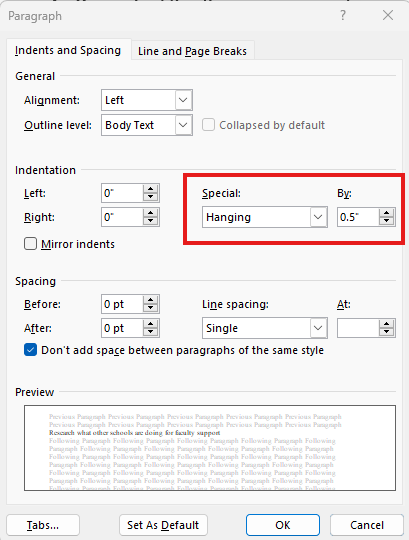
- Click the drop-down menu under the “Special” setting and choose “Hanging.”
- Use the arrows under the “By” setting to choose 0.5 inches (or 1.27cm). Alternatively, type the number directly into the box.
-
Click “OK” to finish and exit the menu.
Using the Ruler:
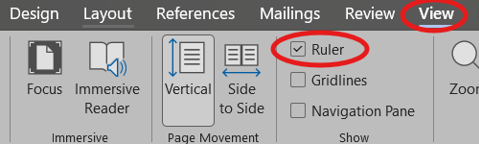
- Click the “View” tab.
-
Check the box beside the “Ruler” option to make a ruler appear at the top of your document.
- Click and drag to highlight your entire list of references. Do not highlight your title (Bibliography, References, Works Cited).
- Click tab once to indent all entries 0.5 inches (or 1.27cm). On the ruler, the two arrows (one pointing up and one pointing down) will shift to match.
-
Without undoing the highlight, click and drag the top arrow to be flush with the margin (right on the divide between the dark and light). This should adjust all your entries.


Online Word
The online version of Word has two ways of displaying the ribbon (menu). By default it may be a smaller, compact version that will make it harder to find the paragraph settings for hanging indents. To change to the normal version, click the arrow on the far right of the ribbon and choose “Classic Ribbon.”
There are two ways to set up hanging indents.
Using the Paragraph Settings:
- Click and drag to highlight your entire list of references (or do these settings before starting your list). Do not highlight your title (Bibliography, References, Works Cited).
- Click the “Home” tab.
-
Click the box/arrow button in the “Paragraph” section.

-
If your ribbon (menu) is collapsed and you do not see the Paragraph section, click the three dots next to the text style box and click “Paragraph Options.” The same menu will open up.

-
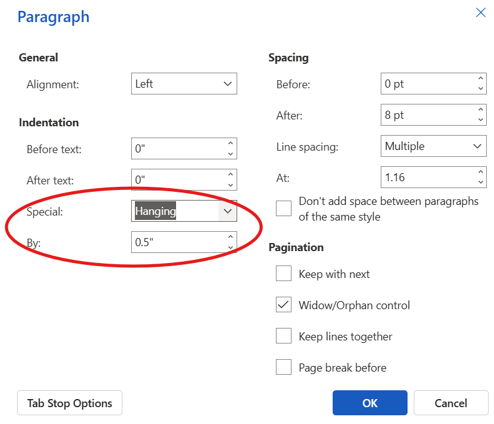
- Click the dropdown menu under the “Special” indentation and choose “Hanging.”
- Use the arrows to the right of the “By” setting to choose 0.5 inches (1.27cm).
- Alternatively, type 0.5 directly into the box.
-
Click “OK” to finish and exit the menu.
Using the Ruler:
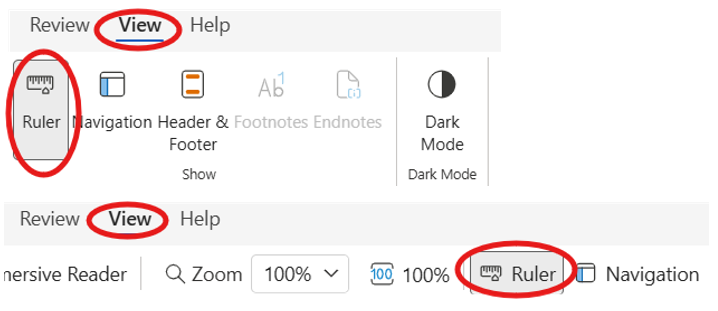
- Click the “View” tab.
-
Click the “Ruler” button to make the ruler appear on top of your document.
- Click and drag to highlight your entire list of references. Do not highlight your title (Bibliography, References, Works Cited).
- Click tab once to indent all entries 0.5’’ (or 1.27cm). On the ruler, the two arrows (one pointing up and one pointing down) will shift to match.
- Without undoing the highlight, click and drag the top arrow to be flush with the margin (right on the divide between the dark and light). This should adjust all your entries.


